
One of the main purposes of your NAS can be to support data backup. Even if you are backing up from a computer into your NAS, I still recommend having an offsite or cloud backup solution.
Both my wife and I use google photos which is nice because picture and movies taken on your phone are automatically backed up in google photos and are available online.
However, we recently lost a bunch of data from google photos. An accident deleted a years worth of photos and unfortunately, there’s now no way to get them back. I decided that it would be worth it to have a NAS backup of that data, which is inline with my vision of having one set of data on the device (phone, laptop or desktop), one version on the NAS and one version in the Cloud (google or in our case, backblaze which I’ll cover in another article).
The Code Repository
I found a docker based task which will log into your google photo account, pull down anything it finds there and copy it to your NAS. The code repository is here and it has the documentation.
Setting Up Your NAS
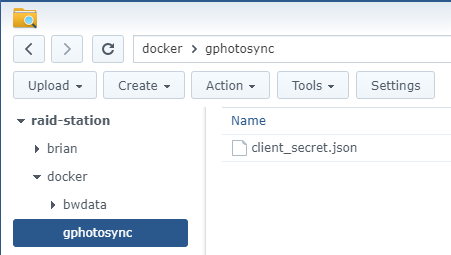
You’ll need to make some new directories
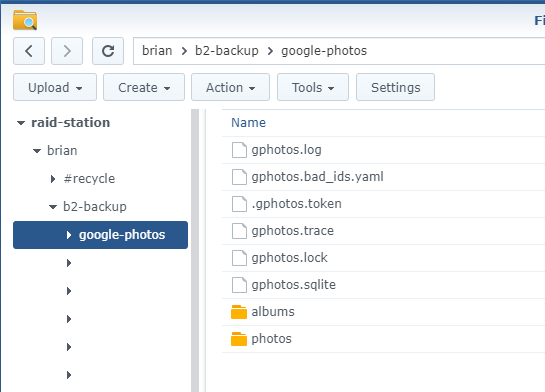
/volume1/docker/gphotosync
/volume1/${your user directory}/gphotos
Setup Google to Allow Access
I’m actually following the directions here. I’m going to copy them here to make it easier to read and follow along. There have also been some updates which I’ll cover in my docs.
Go to google cloud platform. You automatically have an account as a google service user. Just log in with the same account you use on your phone.
Click Create Project button

Call it gphoto-sync and hit create

In order to enable access we need to go to the photo api. Click on the project you just created

In the search box type photos

Pick photos library api

Select Enable

This allows your account to use the photos API. We still need to authorize our app to access that API though.
Go the the consoles api page. (make sure that gphoto project is active in the dropdown).

Click OAuth consent screen. Select External and hit Create

Type a name for the app and select an email from the dropdown

You’ll need to add another email for the developer contact info. Then hit Save and continue.
Don’t set any scopes and hit Save and Continue.

Don’t set any test users and hit save and continue

On the summary page hit back to dashboard. Now select Credentials, select create credentials and select OAuth Id from the dropdown

Select Desktop Application as the application type. Use gphoto-sync as the app name. Hit Create

When you get back to the main screen hit download secret file.

Go back to Oauth consent screen and hit publish app

You should see that it has been published.

Start Docker and Authorize Your App
Copy your secrets file up into your /volume1/docker/gphotosync directory. Rename it to client_secret.json

Its not going to sync the first time. You need to actually authorize your client to access that API.
First, start up docker. You need to do this via SSH. We’re using interactive mode (-it) so that we can interact with the application as its running.
~$ sudo docker run \
    -ti \
    --name gphotos-sync \
    -v /volume1/${your user directory}/gphotos:/storage \
    -v /volume1/docker/gphotosync:/config \
    gilesknap/gphotos-sync:latest \
   /storage
you should see a message similar to this:
-02 15:00:02 WARNING  gphotos-sync 2.14.2 2021-02-02 15:00:02.202815
Please go here and authorize, https://accounts.google.com/o/oauth2/v2/auth?response_type=code&client_id=8...ch7.apps.googleusercontent.com&redirect_uri=urn%3Aietf%3Awg%3Aoauth%3A2.0%3Aoob&scope=https%3A%2F%2Fwww.googleapis.com%2Fauth%2Fphotoslibrary.readonly+https%3A%2F%2Fwww.googleapis.com%2Fauth%2Fphotoslibrary.sharing&state=lN1...v08&access_type=offline&prompt=select_account
Paste the response token here:
copy the url from the screen and paste it into a browser. You’ll see a google OAuth window. Select your account (that you want to get the photos from)

You’ll see a warning window. Click Advanced and Go to gphoto-sync

You’ll see two permissions windows. Click Allow on both


Click Allow on the next confirmation window

Grab the token from the sign in page. Copy it into your clipboard

and paste it into your SSH prompt and hit enter. You should see it start to process your images
02-02 15:05:32 WARNING  Indexing Google Photos Files ...
02-02 15:05:33 WARNING  indexed 3 items
02-02 15:05:33 WARNING  Downloading Photos ...
Automating the Backup
This script only executes once. It will download all of your photos (unless there’s a failure and the container stops), but it won’t pick up any new ones since the last time it ran. Now we need a way to tell the container to run daily (or weekly, etc…). You can write a cron to schedule the container to run, but I actually like the Synology Task Scheduler for this.
Go to the DSM and open up the Control Panel (make sure Advanced Mode is enabled) and open Task Scheduler.

Create a new Scheduled Task for a User-defined Script

Give the task a name (I use Google Photo Sync) and run as root

Schedule to run daily at some time (I use the default of midnight)

On Task Settings you can set a notification email (but this can get noisy). Make sure to set User-defined script to run your docker container with the name of the container you just created
docker container start gphotos-sync
Conclusion
You’ll need to repeat this process for each account you want to backup. This means generating a client secrets for each user, creating a separate docker container (with a unique name) and separate scheduled task.
Please let me know how this worked for you in the comments. I would like to hear if it worked exactly as I described or if there are modifications that you needed to make in order to get it going so that I can update the documentation if needed.
Also, please checkout my other projects and courses related to using your synology and other backup solutions.
Finally, if you’re having issues with google permissions (or rate limiting?) I have an alternate method that you can use with the DSFile application and Google takeout.
This is great – thank you. Worked perfectly for me. Just a shame that the gps location details are not pulled down by the google api. I see there is another docker image which apparently does bring down photos using the chrome dev protocol – but I’ve been unable to get that working. It’s the Jake Wharton docker image called gphotos-cdp – have you played with that at all?
Glad to hear that it worked. Its hard to do it yourself and document at the same time because sometimes I work forward and try to document later and I’m never sure if I got all of the details.
I don’t really have a need for GPS metadata, so I haven’t tried any other method to do the sync. However, I do appreciate the suggestion. My plan is to get some other ideas from people, try them out and document it.
I’ve got a few other projects lined up right now, but I’ll put that one on the list.
Hi awesome guide, i cannot get this to work, do i need to set folders in docker set up first or just create folders within the nas. I have 2 volumes set up on my nas one is my plex sever the other i want to use just for backup ect. any help would be great thank you.
It depends. I can’t tell exactly what the issue is…
Are you missing the actual /volume1/docker folder? If you are using synology and the docker package from the package manager, I believe that the
/volume1/dockershared folder is created for you.Are you asking about where to make the google sync folder location? If so: yes, you create them on the NAS and you can use SSH and command line to do that or make them in the DSM via the File Station tool
docker location
backup location
thanks for reply, im not 100% whats happening, the docker wont run more then a few seconds, i think it could be i have put something incorrectly into docker container.
when i try to follw the SSH guide i cannot get it working.
i Get the error
“docker needs at least 1 argument.”
This is my 4th program im trying to run through docker so please forgive my stupidity.
Is there parts of code missed out or the very start of the guide the docker set up missed out, I cannot see what im missing.
got the google stuff done easily haha
Its okay. This one stumped me in the beginning as well.
When the docker container starts up, it executes a program on startup. In this case we’re running the script, but part of the script needs to know where you’re going to store the files. We’re already mapping the
/storagedirectory to our NAS (-v /volume1/${your user directory}/gphotos:/storage), so you need to tell the script to use that directory when it runs (/storage).In this code block (from the post)
sudo docker run \-ti \
--name gphotos-sync \
-v /volume1/${your user directory}/gphotos:/storage \
-v /volume1/docker/gphotosync:/config \
gilesknap/gphotos-sync:latest \
/storage
The last line is the argument that we’re passing to the script (
/storage).You’re using my code block? If not, can you post it here if you’re still having trouble?
Everything worked great! Thanks so much, you’re a wizard.
Thank you for a great guide – worked perfectly !
Thank you for the excellent guide!
Mine seems running, however the backup folder is still empty after I saw Downloading Photos… log
I have this warning message:
03-11 16:18:13 WARNING Retrying (Retry(total=4, connect=None, read=None, redirect=None, status=None)) after connection broken by ‘ProtocolError(‘Connection aborted.’, ConnectionResetError(104, ‘Connection reset by peer’))’:
Any insights?
I’ve been having similar issues. I’ve opened a ticket with the maintainer here:
https://github.com/gilesknap/gphotos-sync/issues/300
and I opened up a stack exchange ticket here:
https://stackoverflow.com/questions/66415128/google-photos-api-connection-rest-by-peer
If you want to add support data to the github ticket, giles is very responsive. I do not however, have a solution for this. I suspected it might be a DNS issue (caused by pihole), but I don’t have confidence in that root cause anymore. I was going to attempt from a different container on another server, but haven’t had time for that yet.
Let me know what you’ve tried so far…
Just so you know: I never figured this out and have since moved on to a different method. I am now using the DS File android sync tool to sync photos to both the photos app and my NAS. I exported all of my photos one time using google takeout and now I have a copy in both my NAS and my photos account that are both kept in sync.
They’re also backed up into backblaze, but that’s a separate post, I have yet to make.
thx for that. this is super helpfull. I am looking for a way to upload from synology nas to google photos. so the other way.
any idea on how to achieve that?
Someone could have written an app that loads data through the photos API, but I don’t know of one. If you’re only doing it one time why not drag and drop a .zip file or a directory into the photos webpage? I’ve managed to upload hundreds of photos that way very easily.
Thanks for this information. Process was easy to follow and setup.
Quick question: one of the accounts has the photos folder but not the albums folder.
Any thoughts on what might be the issue?
Thanks in advance.
Unfortunately, I don’t support the software. I suspect you’ll have to follow up with Giles.
This is an excellent guide and while I had it working in the past, somehow I am not able to get it working again. It stopped working in November 2020 and I just tried to do this from scratch, but somehow google seems to provide some issues.
Here the warning & error I am getting – means I cannot even do the authentication step at the very end.
Any idea ?
Thanks so much
04-28 06:48:58 WARNING gphotos-sync 2.14.2 2021-04-28 06:48:58.876619
04-28 06:48:59 ERROR
Process failed.
Traceback (most recent call last):
File “/usr/local/lib/python3.7/site-packages/requests_oauthlib/oauth2_session.py”, line 478, in request
url, http_method=method, body=data, headers=headers
File “/usr/local/lib/python3.7/site-packages/oauthlib/oauth2/rfc6749/clients/base.py”, line 198, in add_token
raise TokenExpiredError()
oauthlib.oauth2.rfc6749.errors.TokenExpiredError: (token_expired)
During handling of the above exception, another exception occurred:
Traceback (most recent call last):
File “/usr/local/lib/python3.7/site-packages/gphotos/Main.py”, line 417, in main
self.setup(args, db_path)
File “/usr/local/lib/python3.7/site-packages/gphotos/Main.py”, line 309, in setup
self.google_photos_client = RestClient(photos_api_url, self.auth.session)
File “/usr/local/lib/python3.7/site-packages/gphotos/restclient.py”, line 38, in __init__
service_document = self.auth_session.get(api_url).json()
File “/usr/local/lib/python3.7/site-packages/requests/sessions.py”, line 543, in get
return self.request(‘GET’, url, **kwargs)
File “/usr/local/lib/python3.7/site-packages/requests_oauthlib/oauth2_session.py”, line 497, in request
self.auto_refresh_url, auth=auth, **kwargs
File “/usr/local/lib/python3.7/site-packages/requests_oauthlib/oauth2_session.py”, line 446, in refresh_token
self.token = self._client.parse_request_body_response(r.text, scope=self.scope)
File “/usr/local/lib/python3.7/site-packages/oauthlib/oauth2/rfc6749/clients/base.py”, line 421, in parse_request_body_response
self.token = parse_token_response(body, scope=scope)
File “/usr/local/lib/python3.7/site-packages/oauthlib/oauth2/rfc6749/parameters.py”, line 431, in parse_token_response
validate_token_parameters(params)
File “/usr/local/lib/python3.7/site-packages/oauthlib/oauth2/rfc6749/parameters.py”, line 438, in validate_token_parameters
raise_from_error(params.get(‘error’), params)
File “/usr/local/lib/python3.7/site-packages/oauthlib/oauth2/rfc6749/errors.py”, line 405, in raise_from_error
raise cls(**kwargs)
oauthlib.oauth2.rfc6749.errors.UnauthorizedClientError: (unauthorized_client) Unauthorized
04-28 06:48:59 WARNING Done.
Well – I think I found the solution myself. I also think that can be interesting for other people. Once I used a new folder instead of using the old folder from last year, then it worked just fine.
Thanks a lot and good luck for everyone else
Cool. Sorry for the late approval. Glad you found something that worked for you. Maybe it will help someone else.
Rather than remove the entire directory you can just delete .gphotos.token file and it will ask you to go through the authentication process again.
Thanks for the helpful guide! I have run into a bit of a snag after apparently importing my Google Photos library. I can’t seem to find the files anywhere on my NAS including the folder I pointed to download the files to. Is this perhaps a permissions issue?
This is the command I used:
sudo docker run \
> -ti \
> –name gphotos-sync \
> -v /volume1/homes/joeshmoe/gphotosync \
> -v /volume1/docker/gphotosync:/config \
> gilesknap/gphotos-sync:latest \
> /storage
This was the output after pasting the response token:
05-09 16:25:16 WARNING Indexing Google Photos Files …
05-09 16:26:13 WARNING indexed 8440 items
05-09 16:26:13 WARNING Downloading Photos …
05-09 16:37:12 WARNING Downloaded 8440 Items, Failed 0, Already Downloaded 0
05-09 16:37:12 WARNING Indexing Shared (titled) Albums …
05-09 16:37:30 WARNING Indexed 61 Shared (titled) Albums
05-09 16:37:30 WARNING Indexing Albums …
05-09 16:37:32 WARNING Indexed 3 Albums
05-09 16:37:32 WARNING Downloading Photos …
05-09 16:39:04 WARNING Downloaded 9085 Items, Failed 0, Already Downloaded 8440
05-09 16:39:04 WARNING Creating album folder links to media …
05-09 16:39:05 WARNING Created 994 new album folder links
05-09 16:39:06 WARNING Done.
And this is how the folder looks that I tried to sync to:
https://imgur.com/a/mhwLQVK
Even in the terminal, the folder looks empty. Any ideas where my photos ended up?
My guess is that you didn’t map the internal storage location to your external volume. So the container downloaded the files and stored them inside the container. If you bounce the instance, they’ll disappear.
I think you need to change your mapping
-v /volume1/homes/joeshmoe/gphotosync
To
-v /volume1/homes/joeshmoe/gphotosync:/storage
Hi,
Do I need to leave the terminal open while downloading or can I close the terminal and the synology will continue to download the images?
You need to leave it open if you’re using my command. You can
nohup(no hang up) and run it in the background, but you’ll have to look up how to do that.Thank you so much Bullyrook. This really helped a lot!
I manage to back-up everything during the night. So happy 🙂
Awesome! Glad to hear it. Please share the guide (and help me get some traffic!)
Hello, great that I found these instructions. It works fine. Unfortunately, the download still takes a few hours because there are so many photos. Is it correct that the images loaded up to now are not yet displayed in photos? I only see the folder but not 2021 and then the months.
I’m not sure. I don’t use this method anymore because I was having issues connecting to gphotos.
Hi Bullyrook,
Sorry, very dumb question… I managed to get to Putty, and install it. Can get in to terminal mode. My dumb question: I get to $ sudo docker run \ and I’m unsure how to input these commands into the command line. Do I literally type one at a time? I’m so close! 😉
No worries. You got this far.
the “~$” means that I’m running this as root from the home directory. it just there to help you know who and where I am when I’m running this.
you need to copy paste the whole rest of the command
sudo docker run \

    -ti \

    --name gphotos-sync \

    -v /volume1/${your user directory}/gphotos:/storage \

    -v /volume1/docker/gphotosync:/config \

    gilesknap/gphotos-sync:latest \

   /storage
and paste that into terminal. the “\” means the command continues on the next line. terminal _should_ recognize that and allow you to paste it in without executing each line individually (which is invalid). Then hit enter.
Good afternoon. thanks for the detailed instructions. everything downloaded fine, only the problem with the albums, the folders are empty for some reason, tell me what the problem is?
I’m not sure I can help. I use a different method now. You may want to reach out to the project owner (I just documented the setup)
It works for me! Thank you so much!
Hi, just wanted to say thanks for your detailed guide. It even worked for a NAS starter like me. A few things I needed to figure out on the way what can be helpful for fellow starters like me:
-on Mac you can simply use the Terminal
-dont forget to turn on SSH in the Control Panel
-docker does not seem to like capital letters or space in the path to your folder
Cool! Thanks for the feedback. Glad to hear that you’re starting down the home networking path. There’s a lot of stuff to learn and time to waste. Thanks for the helpful guidance for future people to follow.
These instructions do not work after Feb 28, 2022.
https://developers.googleblog.com/2022/02/making-oauth-flows-safer.html#instructions-oob
OAuth out-of-band (oob) flow will be deprecated
OAuth out-of-band (OOB) is a legacy flow developed to support native clients which do not have a redirect URI like web apps to accept the credentials after a user approves an OAuth consent request. The OOB flow poses a remote phishing risk and clients must migrate to an alternative method to protect against this vulnerability. New clients will be unable to use this flow starting on Feb 28, 2022.
Good call. I am not necessarily supporting this method currently as I have moved to a new method Migrating Away From Google Photos Using your NAS : Overview
However, if could please notify the original developer I see if we can update the process.
I’m just setting up my new NAS so still experimenting with different options for backups.
I found a way to make this work – here’s what I did:
– in the client_secrets.json file, removed the redirect_uri “urn:ietf:wg:oauth:2.0:oob”
– after confirming access and pressing the Allow button, my brower redirects to localhost and displays a ‘This site cannot be reached” page
– in the URL of the page that failed to load, there are three query params: state, code, and scope. Copy the code value – it is the token
– paste the value into the SSH session that is waiting for the token
– syncing should begin
WOW – Thankyou so much – I spent hours trying to work this out. Truly appreciate your help
Man I had this issue and had been looking all over for a solution. Thank you!!
Hi, I’ve been spending days to get GPhoto Sync working on a QNAP Docker image. All the examples I found are either Synology or Unraid. None of these do work on QNAP. Error : root_folder not found, gilesknap/gpotos-syns does not exist, etc each time I get different errors.
Any QNAP guru who can help me out and get it running? Thank you.
I wanted to show the backed up pictures in the Synology Photos app. I had the problem that the files are created under user root. I added
docker container start gphotos-sync
docker container wait gphotos-sync #wait till container finished
sync #maybe not needed
sleep 1 #maybe not needed
find /volume1/photo/gphotos/photos/$(date +’%Y’)/ -maxdepth 1 -type d -not -group users -exec bash -c ‘chown admin ${0}; chgrp users ${0}; chmod a+rw ${0}’ {} \; # change access rights of directory
find /volume1/photo/gphotos/photos/$(date +’%Y’)/ -maxdepth 2 -type f -not -group users -exec bash -c ‘chown admin ${0}; chgrp users ${0}; chmod a+rw ${0}; touch ${0}’ {} \; # change access rights of files
synoindex -R /volume1/photo/gphotos/photos/$(date +’%Y’)/$(date +’%m’)/ #reindex
#TODO: the year folders /volume1/photo/gphotos/photos/$(date +’%Y’)/ owner is not yet changed
to the automation task, and now it seems to work, but I’m not yet sure of it.
Got the same problem, checking and trying all different kind of persmission settings, without result.
Will try your option soon, hope this is somhow to be fixed soon..
Does this guide still work in 2023?
Thanks for these instructions. I was able to get the process to run by
1. First setting up the OAuth Client ID at the new instructions for the OAuth setup .
2. Running the process locally to get the client token (and then copying it to the synology container folder) at https://gilesknap.github.io/gphotos-sync/main/tutorials/installation.html#headless-gphotos-sync-servers.
3. Running your docker run command.
Hi,
took me a while but just a quick update: end of 2023 this is still working with small amendments: It seems direct initial execution via docker is not populating .gphotos.token file anymore (at least it did not for me): after passing your token it just hands and nothing is visible in gphotos.log. Workaround as Alex Dean mentioned above is to follow instruction and first run gphotos-sync on Windows python enabled machine following https://gilesknap.github.io/gphotos-sync/main/how-to/windows.html (its pretty straight forward) . Once you get your .gphotos.token in your google photo backup folder. Upload it into the /volume1/${your user directory}/gphotos and start docker container as per instruction given here.
Download will start 🙂
Happy Xmas!
Thanks for this instructions, they helped a lot the setup gphoto-sync on my Synology!
Couple of details, which probably changed since the article was written: The Google setup process looks slightly different, but wasn’t a problem to follow
However, running the docker via SSH needs some adjustments. But it is not necessary to run gphoto-sync on a Windows pyhton enabled machine (“Synology_user” on December 21, 2023). Just add an additional parameter to run gphoto-sync the first time:
sudo docker run \
-ti \
–name gphotos-sync \
-v /volume1/${your user directory}/gphotos:/storage \
-v /volume1/docker/gphotosync:/config \
-p 8080:8080 \
gilesknap/gphotos-sync:latest \
/storage
(By doing so, you open up Port 8080 on your NAS. )
After that, the prompt with the links according the instructions will follow. Copy the link in your webbrowser and grant permission.
After that, your webbrowser will show you a “page not found error”, because it’s point to “localhost” which is off course not running on your actual machine.
Simply replace the ‘localhost’ in that URL with your Synology’s IP and add the port 8080.
Let’s say, your Synology has the IP 192.168.0.100, then use
http://192.168.0.100:8080 [follow by the rest of the URL]
By doing so, the Synology is correctly adresses, you should get a brief information in your webbrowser ,and at the same time, via SSH you should now see that gphoto-sync starts pulling your photos.
Hello,
Thanks for the latest inputs !
I have tried all of this, but the thing is the docker run command doesn’t shows the message it expects a token. Once it displays the message with the link for authentication, it stops there, so I don’t get any place where to paste the token.